This is going to be a fun one! We’re going to utilize Infrastructure as Code (IaC) via Terraform to create a VPC on Google Cloud Platform (GCP) and along the way we’re going to define firewall rules, a cloud router, cloud nat, and create a virtual machine or two, and explore options for enabling egress traffic. This is going to contain a lot of great information and I’m exciting to get started!
What You’ll Need
- GCP project with sufficient permissions to enable services and deploy infrastructure
- A coding IDE — I’m using VS Code
- an installation of Terraform
Source Code
Download source code for this project from the vicsprotips GitHub!
Let’s Begin!
Ok — we’re going to use Terraform with GCP to define a network, define some firewall rules, and deploy some VMs. Let’s start by creating a new folder and the following files:

Now we’ll begin adding code to each of the files.
backend.tf
I like to keep my Terraform state files on a GCS bucket. We can do this by configuring our backend.tf similar to the following. Here is a link to the official docs for the Terraform GCS backend block
terraform {
    backend "gcs" {
        bucket = "vpt-sandbox-tfstate"
        prefix = "terraform/state/sandbox/vpc/basic"
    }
}
In the above block I’m specifying which GCS bucket I want to store my Terraform state files and defining a prefix for where to store them on the bucket. Configure both of these to your situation. Changing the bucket to something like bucket = “YOUR_BUCKET_NAME” line will be sufficient for you.
main.tf
In our main.tf we’ll define our provider as “google” and set our provider project and region information. Here is a link to the official docs for the Google provider block.
provider "google" {
    project = var.project-id
    region  = var.region
}
variables.tf
variable "project-id" {
  type = string
  description = "GCP project-id to deploy to"
}

variable "region" {
  default = "us-central1"
}

variable "vpc-name" {
  default = "my-sandbox-vpc"
}
Based on our variables.tf we will prompt the user to enter the project-id when we run terraform apply. We’ve also set the region and the vpc-name with default values that we want to use during creation. Feel free to customize these as needed!!!
Up to this point it’s pretty similar to this Pro Tip. Next we need to enable a Google API to allow us to create a new VPC.
enable-services.tf
Now we need to tell GCP that we want to enable the ‘compute.googleapis.com’ service so that we can create our VPC. For reference review the official documentation for the google_project_service block.
resource "google_project_service" "enable-compute-api" {
  project = var.project-id
  service = "compute.googleapis.com"
  timeouts {
    create = "2m"
    update = "2m"
  }
  disable_dependent_services = false
  disable_on_destroy = false
}
In the above code block, we’re telling GCP that we want to enable the ‘compute.googleapis.com’ service and give it a two minute window for any create or update operations.
Pro Tip: The remaining two commands, disable_dependent_services and disable_on_destroy are optional parameters. For this example I’m setting them to false so that there is no risk of disabling services that things outside of this Terraform config might be using. Depending on your use case you might want to set these options to true but for this exercise false is fine. It will also save us some time on successive ‘terraform apply’ operations as well since the service doesn’t deactivate once enabled.
vpc.tf
Next we’re going to define our VPC that consists of a single subnet in the region we specified in our variables.tf. We will specify the name, CIDR range, and region for the subnetwork. In a later step we’re going to create some compute engine VMs. In order for the VPC to support outbound traffic we need to create a cloud router and a NAT (both are included in this Terraform configuration). Useful reference documentation links are:
resource "google_compute_network" "vpc" {
  depends_on = [ google_project_service.enable-compute-api ]
  name = var.vpc-name
  auto_create_subnetworks = false
}

resource "google_compute_subnetwork" "my-vpc-subnet" {
  name          = "${var.vpc-name}-${var.region}"
  network       = google_compute_network.vpc.id
  ip_cidr_range = "10.0.0.0/16"
  region        = var.region
}

resource "google_compute_router" "router" {
  name    = "${var.vpc-name}-router"
  region  = google_compute_subnetwork.my-vpc-subnet.region
  network = google_compute_network.vpc.id

  bgp {
    asn = 64514
  }
}

resource "google_compute_router_nat" "nat" {
  name                               = "${var.vpc-name}-router-nat"
  router                             = google_compute_router.router.name
  region                             = google_compute_router.router.region
  nat_ip_allocate_option             = "AUTO_ONLY"
  source_subnetwork_ip_ranges_to_nat = "ALL_SUBNETWORKS_ALL_IP_RANGES"

  log_config {
    enable = true
    filter = "ERRORS_ONLY"
  }
}
firewall-rules.tf
Now we need to add security to our VPC by defining some firewall rules, namely the following:
- disable all ingress
- disable all egress
- allow SSH for Identity Aware Proxy (so we can ssh into our private VMs)
- Allow egress for compute instances having a specific target_tag
Here is the official reference documentation for google_compute_firewall resource blocks.
Now let’s look at the firewall rules and then review their settings.
# Enable SSH into the network via Identity Aware Proxy (IAP) (ie, to ssh into a vm)
resource "google_compute_firewall" "allow-iap" {
  name          = "allow-iap"
  network       = google_compute_network.vpc.name
  source_ranges = ["35.235.240.0/20"]
  priority      = 1000
  allow {
    protocol = "icmp"
  }
  allow {
    protocol = "tcp"
    ports    = ["22"]
  }
}

# deny all ingress traffic not allowed by a higher priority rule
resource "google_compute_firewall" "deny-all-ingress" {
  name          = "deny-all-ingress"
  network = google_compute_network.vpc.name
  priority      = 65535
  direction     = "INGRESS"
  source_ranges = ["0.0.0.0/0"]
  # Deny all traffic
  deny {
    protocol = "all"
  }
}

# deny all egress traffic not allowed by a higher priority rule
resource "google_compute_firewall" "deny-all-egress" {
  name    = "deny-all-egress"
  network = google_compute_network.vpc.name
  priority = 65535
  direction = "EGRESS"

  deny {
    protocol = "all"
    ports    = []
    }
}

# enable egress for any instances with the 'allow-egress-tag'
resource "google_compute_firewall" "allow-egress-tag" {
  name = "allow-egress-tag"
  network = google_compute_network.vpc.name
  target_tags = ["allow-egress-tag"]
  priority = 65534
  direction = "EGRESS"
  allow {
    protocol = "all" # refine as needed
  }
}
In the above Terraform configuration we define the following firewall rules:
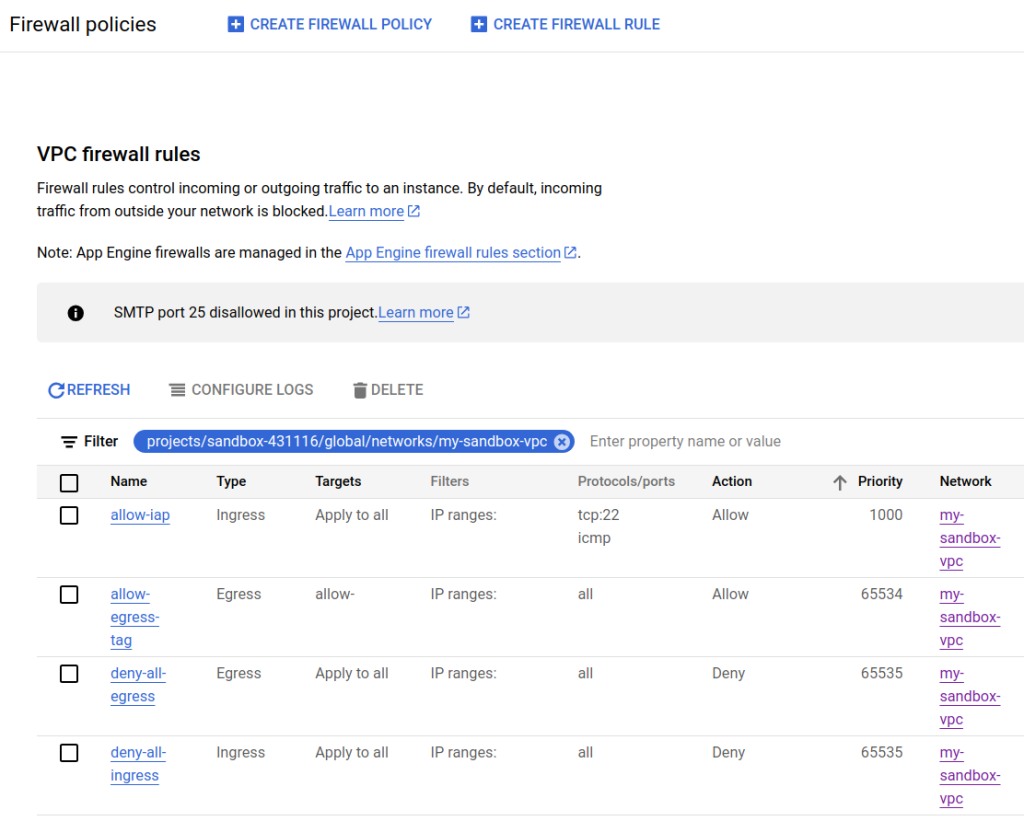
- allow-iap: Allow GCP Identity Aware Proxy IP ranges to provide SSH support into our compute instance VMs
- allow-egress-tag: Allow compute instances within our VPC to have egress permission only if they have the specified tag. (Note — name the tag what you want.)
- deny-all-egress: Unless overridden by a higher priority rule, deny all egress traffic for this VPC
- deny-all-ingress: Unless overridden by a higher priority rule, deny all ingress traffic for this VPC
Pro Tip: For firewall priorities, entries with lower numbers are higher priority. As seen above, the deny-all-ingress and deny-all-egress each have a priority of 65535 which is lower than the other priorities. Firewall rules with lower priority value (ie, 1000) are higher priority rules and will override lower (65535) valued rules.
compute-engine-instances.tf
Now it’s time to create two compute engine VMs that will be on our newly created private VPC. One of the VMs will be created with our tag for allowing egress and the other VM will not have that tag. Note: you can name the tag whatever you like, just keep it consistent between the VM and firewall rule definitions.
Here is the official documentation for the google_compute_instance resource blocks.
# Create a vm with an egress tag
resource "google_compute_instance" "vm-1" {
  depends_on = [ google_compute_network.vpc ]
  project      = var.project-id
  zone         = "us-central1-c"
  name         = "vm-1"
  machine_type = "e2-micro"

  boot_disk {
    initialize_params {
      image = "debian-cloud/debian-11"
    }
  }
  network_interface {
    subnetwork = google_compute_subnetwork.my-vpc-subnet.self_link
  }
  tags = ["allow-egress-tag"]
}

# Create a vm without an egress tag
resource "google_compute_instance" "vm-2" {
  depends_on = [ google_compute_network.vpc ]
  project      = var.project-id
  zone         = "us-central1-c"
  name         = "vm-2"
  machine_type = "e2-micro"

  boot_disk {
    initialize_params {
      image = "debian-cloud/debian-11"
    }
  }
  network_interface {
    subnetwork = google_compute_subnetwork.my-vpc-subnet.self_link
  }
  # tags = ["allow-egress-tag"]
}
Now that we’ve defined our VPC, firewall rules, cloud router and nat, and some test VMs, it’s time to initialize our project and deploy it!
Deploy Our Terraform Configurations
Save your files and open a bash terminal within the folder where you’ve been keeping the Terraform files. Let’s initialize our Terraform environment via terraform init.
terraform initYou should see something similar to the following.

Next we’re going to deploy our newly created Terraform configuration via ‘terraform apply’. Recall that our variables.tf is set to prompt us for the project-id.

After providing the project-id, Terraform will show you a list of items it is going to add / change / destroy based on the Terraform config being applied. Mine looks like:
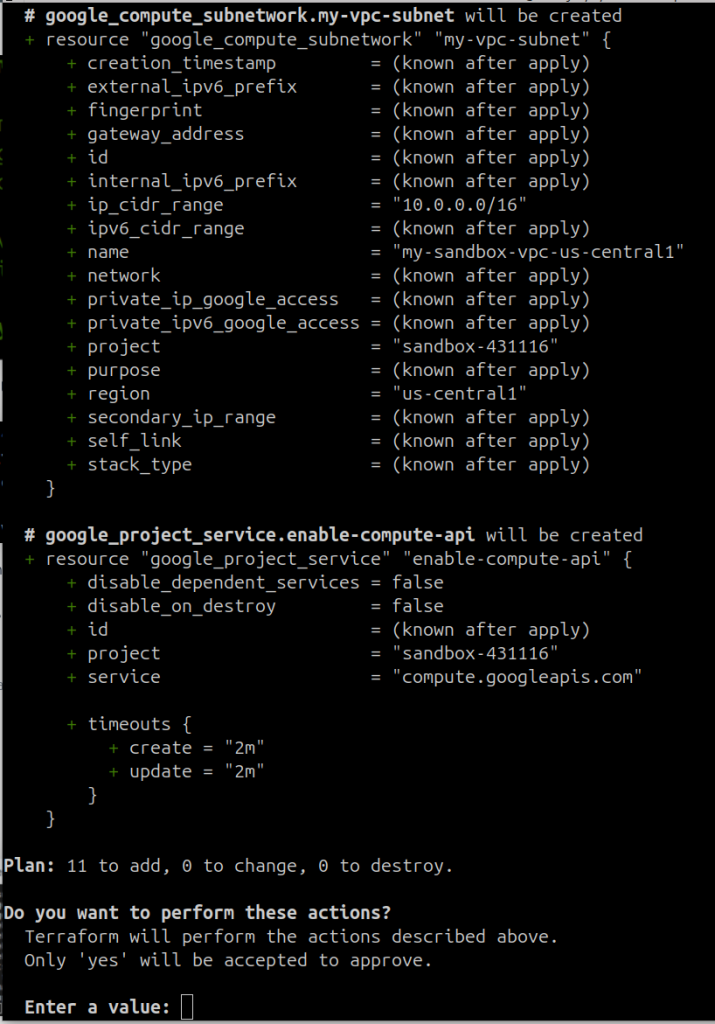
Review the output and if you’re happy with it, type ‘yes’. Terraform will now begin deploying the infrastructure we have defined.
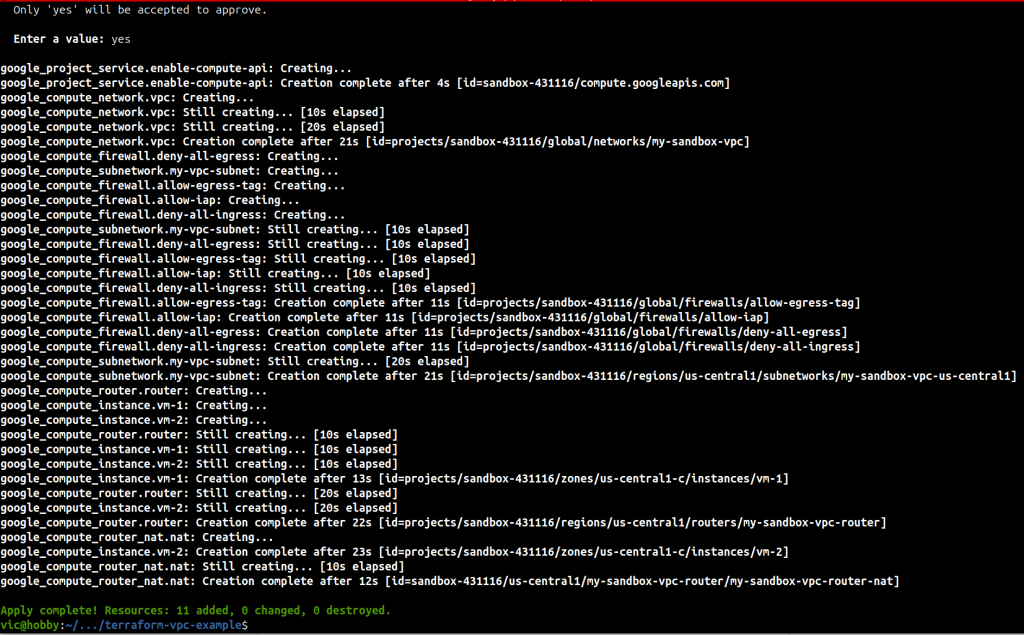
Pro Tip: If you get a GCP permissions error you likely need to run “gcloud auth application-default login” and “gcloud auth login“. After that, try terraform apply again.
Verify the Results
Login to your GCP Console for the project you deployed the configuration to and let’s verify
VPC
The following screenshot from GCP Console shows that we successfully created a VPC consisting of a single subnet in the us-central1 region.

Firewall Rules
The following screenshot shows our four firewall rules that we created for our VPC. Note in the screenshot that the rules are ordered by priority.
Compute Engine
In this screenshot we see that two GCE VMs have been created as we defined in our Terraform configuration.

Inspecting vm-1 we see our tag:

Cloud Router
Here is our Cloud Router based on our Terraform configuration.

Cloud NAT
Last but not least, here is our Cloud NAT via GCP Console.

Let’s Test the VMs!
Now it’s time to test SSH into the VMs and then run a networking task within each VM to verify that they are working as we expect.
Go to Compute Engine and SSH into each VM as I’m doing below.
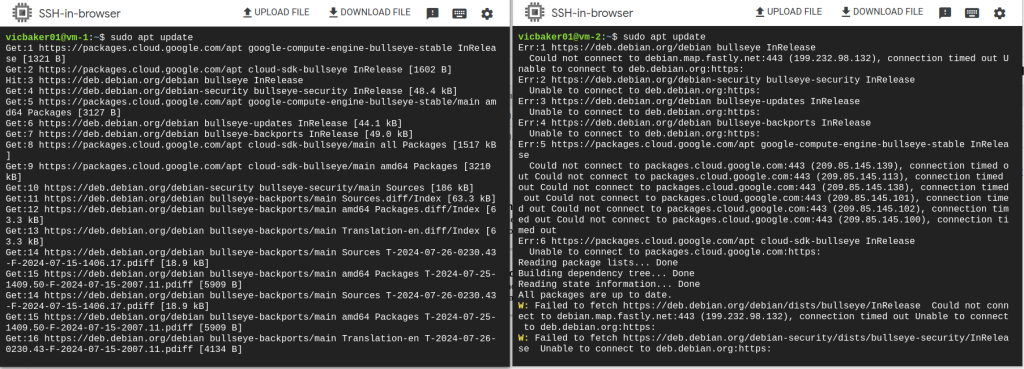
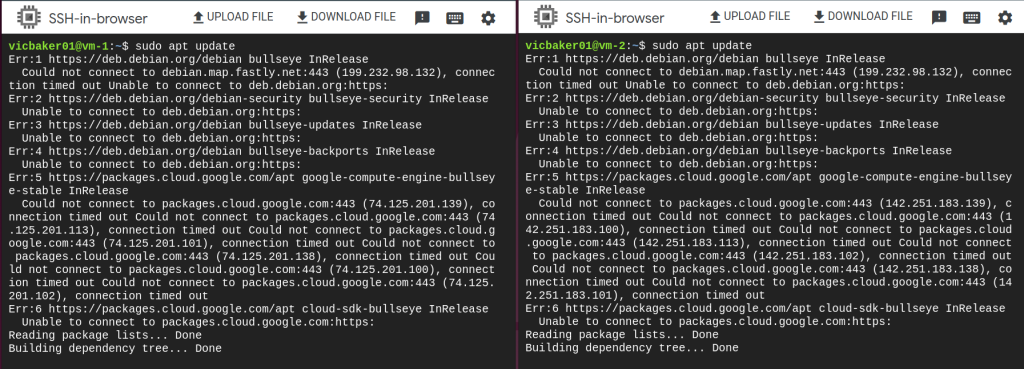
In the above screenshots we can see vm-1 on the left and vm-2 on the right. The ‘allow-egress-tag’ is set for vm-1 but not for vm-2. From within each terminal we can run ‘sudo apt update’ and see that vm-1 is able to contact the outside world whereas vm-2 is not able to contact the outside world.
Pro Tip: Recall that we explicitly created a firewall rule to allow SSH for Identity Aware Proxy CIDR, If you are unable to SSH into your VMs, remember to create this firewall rule.
Continued Exploration: Removing Cloud Router and Cloud NAT
Let’s remove the cloud router and cloud NAT from your vpc.tf so that it looks like the following:
resource "google_compute_network" "vpc" {
  depends_on = [ google_project_service.enable-compute-api ]
  name = var.vpc-name
  auto_create_subnetworks = false
}

resource "google_compute_subnetwork" "my-vpc-subnet" {
  name          = "${var.vpc-name}-${var.region}"
  network       = google_compute_network.vpc.id
  ip_cidr_range = "10.0.0.0/16"
  region        = var.region
}

# resource "google_compute_router" "router" {
#   name    = "${var.vpc-name}-router"
#   region  = google_compute_subnetwork.my-vpc-subnet.region
#   network = google_compute_network.vpc.id

#   bgp {
#     asn = 64514
#   }
# }

# resource "google_compute_router_nat" "nat" {
#   name                               = "${var.vpc-name}-router-nat"
#   router                             = google_compute_router.router.name
#   region                             = google_compute_router.router.region
#   nat_ip_allocate_option             = "AUTO_ONLY"
#   source_subnetwork_ip_ranges_to_nat = "ALL_SUBNETWORKS_ALL_IP_RANGES"

#   log_config {
#     enable = true
#     filter = "ERRORS_ONLY"
#   }
# }
Save the updated configuration and run terraform apply, and enter the project-id again. When the command is finished, go back to your two SSH sessions for vm-1 and vm-2. Try the ‘sudo apt update‘ command again in each terminal and you will now see that neither of them can communicate with the outside world. This is because we removed the NAT and router from our config.
