In this article we’re going to setup a GCP Global Load Balancer that connects to services running on Google Kubernetes Engine (GKE) and on Cloud Run. We’re going to setup Network Endpoint Groups (NEGs) for each service, create the load balancer, create a health check, create routes, create a firewall rule, and test it out. This example is going to use the GCP Portal for most edits, however for additional information, please see this GCP article.
What You’ll Need:
You’re going to need a GKE cluster, an installation of helm and kubectl, access to GCP Portal, and sufficient permissions to perform the tasks outlined (ie, Editor). I’m using a GKE Autopilot cluster.
Cheat sheet:
Below is a collection of useful commands:
gcloud compute network-endpoint-groups list
kubectl get svcneg [-n namespace] neg
kubectl describe svcneg [-n namespace]
kubectl delete svcneg [-n namespace] neg
Create a Sample Helm Chart:
Create a new helm chart via:
helm create neg-testUpdate the service.yaml:
Update the newly generated service.yaml with the network endpoint group annotations. Note that the name ‘neg-test’ needs to be unique in the region and can be named different than the app itself, and can also be auto-generated. Refer to this GCP link on NEGs for more detail.
Pro Tips: The port 80 used below is the port that the container is publishing to. In the above GCP NEG link, port 9376 is used because that container is publishing to port 9376. In our example, nginx publishes to the container’s targetPort 80 so we’re setting the NEG to use port 80.
apiVersion: v1
kind: Service
metadata:
  name: {{ include "neg-test.fullname" . }}
  ############# begin new code ###############
  annotations:
    cloud.google.com/neg: '{"exposed_ports": {"80":{"name": "neg-test"}}}'
  ############# end new code ###############
  labels:
    {{- include "neg-test.labels" . | nindent 4 }}
spec:
  type: {{ .Values.service.type }}
  ports:
    - port: {{ .Values.service.port }}
      targetPort: http
      protocol: TCP
      name: http
  selector:
    run: {{ include "neg-test.fullname" . }}
    {{- include "neg-test.selectorLabels" . | nindent 4 }}
Next, we’re going to update the deployment.yaml
Update the deployment.yaml:
Next we’ll add run: tags to the deployment that was autogenerated by helm create. I’ve commented the additions below.
apiVersion: apps/v1
kind: Deployment
metadata:
  name: {{ include "neg-test.fullname" . }}
  labels:
    ###### begin new code ######
    run: {{ include "neg-test.fullname" . }}
    ###### end new code ######
    {{- include "neg-test.labels" . | nindent 4 }}
spec:
  {{- if not .Values.autoscaling.enabled }}
  replicas: {{ .Values.replicaCount }}
  {{- end }}
  selector:
    matchLabels:
      ###### begin new code ######
      run: {{ include "neg-test.fullname" . }}
      ###### end new code ######
      {{- include "neg-test.selectorLabels" . | nindent 6 }}
  template:
    metadata:
      {{- with .Values.podAnnotations }}
      annotations:
        {{- toYaml . | nindent 8 }}
      {{- end }}
      labels:
        ###### begin new code ######
        run: {{ include "neg-test.fullname" . }}
        ###### end new code ######
        {{- include "neg-test.selectorLabels" . | nindent 8 }}
    spec:
      {{- with .Values.imagePullSecrets }}
      imagePullSecrets:
        {{- toYaml . | nindent 8 }}
      {{- end }}
      serviceAccountName: {{ include "neg-test.serviceAccountName" . }}
      securityContext:
        {{- toYaml .Values.podSecurityContext | nindent 8 }}
      containers:
        - name: {{ .Chart.Name }}
          securityContext:
            {{- toYaml .Values.securityContext | nindent 12 }}
          image: "{{ .Values.image.repository }}:{{ .Values.image.tag | default .Chart.AppVersion }}"
          imagePullPolicy: {{ .Values.image.pullPolicy }}
          ports:
            - name: http
              containerPort: 80
              protocol: TCP
          livenessProbe:
            httpGet:
              path: /
              port: http
          readinessProbe:
            httpGet:
              path: /
              port: http
          resources:
            {{- toYaml .Values.resources | nindent 12 }}
      {{- with .Values.nodeSelector }}
      nodeSelector:
        {{- toYaml . | nindent 8 }}
      {{- end }}
      {{- with .Values.affinity }}
      affinity:
        {{- toYaml . | nindent 8 }}
      {{- end }}
      {{- with .Values.tolerations }}
      tolerations:
        {{- toYaml . | nindent 8 }}
      {{- end }}
Now it’s time to deploy the updated charts.
Deploy the Helm Chart:
Navigate to the helm chart directory and deploy the helm chart via:
helm install neg-test .List and describe the running NEGs via:
gcloud compute network-endpoint-groups list
kubectl get svcneg
kubectl describe svcneg neg-test
Pro Tip: To delete the NEG, uninstall the helm chart and then manually delete the NEG via:
kubectl delete svcneg neg-testCreating the Global Load Balancer:
Now that the sample application has been deployed along with the NEGs, it’s time to setup the Global Load Balancer.
Within the GCP Portal, navigate to Network Services and select Create Load Balancer.

For this example we’re going to setup an HTTP(s) Load Balancer as show below.
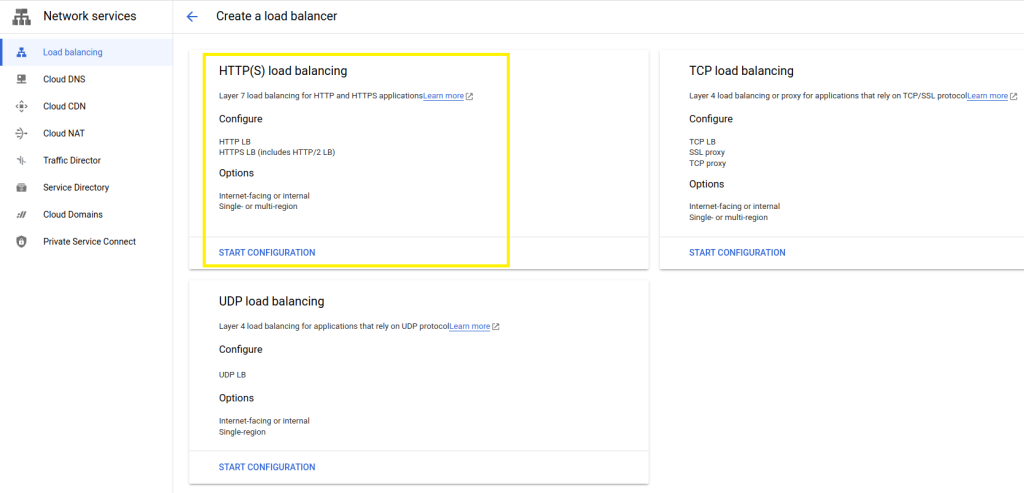
We’re going to setup a Global HTTP(s) load balancer to allow internet traffic to reach our VMs and serverless services as shown below and then press Continue.

Next let’s name the new load balancer as “my-neg-test” and the frontend as “my-neg-test-frontend” as shown below. You can name them as you like. I’m also setting the protocol as HTTP for this example. If you choose HTTPS (includes HTTP/2), the port will automatically change to 443 and give you an option to provide / generate a certificate. For now, we’ll stick with HTTP and port 80. Press “Done” in the lower right of the GCP portal when you’re ready to proceed to the next step.
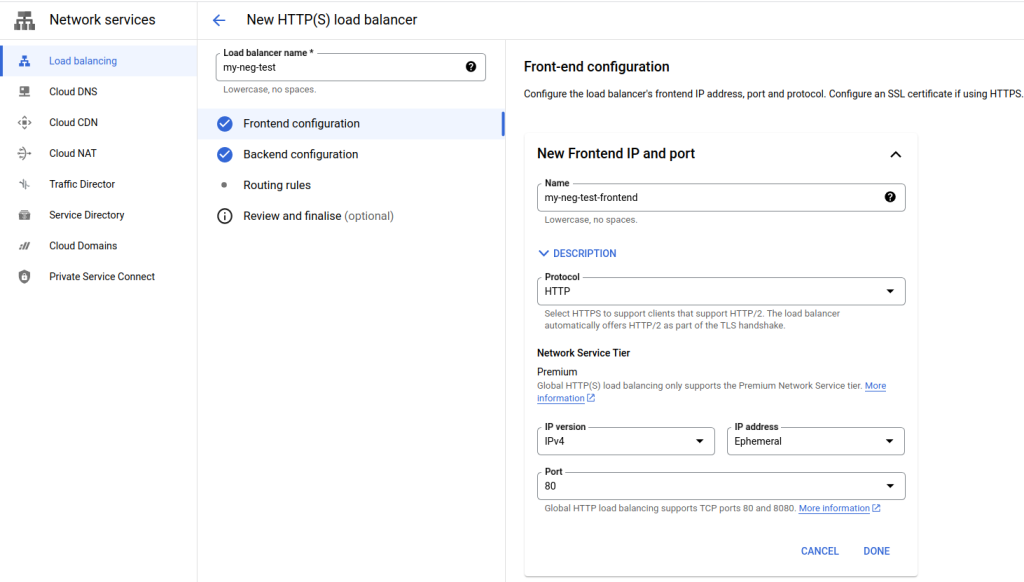
Now we’ll select “Backend Configuration” and select “Create a Backend Service” from the screen shown below.

The next screen is rather long in the GCP portal and I’m going to split it up into logical sections in this example. Let’s first name our backend, give it a description, and select “Zonal network endpoint group” from the Backend Type dropdown. Leave the Protocol and Timeout as is for this example.
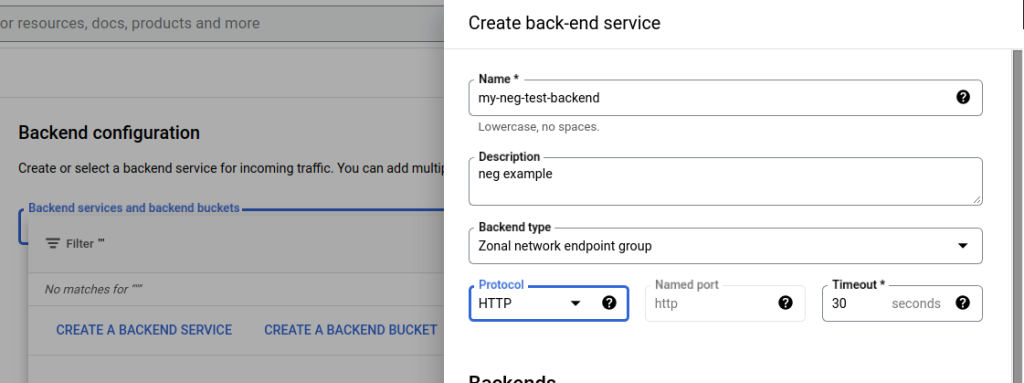
We’ll now set the Backends block. Select the New Backend dropdown and you should see the neg’s that we recently deployed via our sample helm chart.

Select the neg-test (us-east4-a) In the Rate field, enter 1000. I randomly chose 1000, do what you think is best. GCP docs say that if the RPS is exceeded, it doesn’t matter — the backend will continue accepting requests. Click “Done” and you should see something that resembles the following:

Add the other two backends (us-east4-b) and (us-east4-c) in by clicking the Add Backend link.
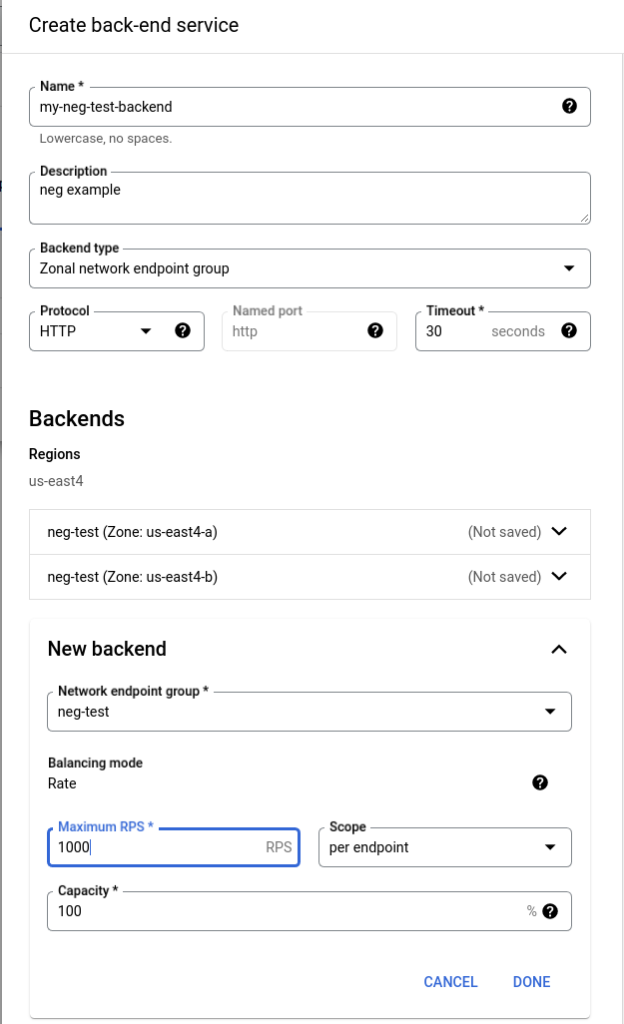
Your result should now look like this:

Next, for this example I’m going to unselect the Enable Cloud CDN and will next focus on the Health Check shown at the bottom of the following image.
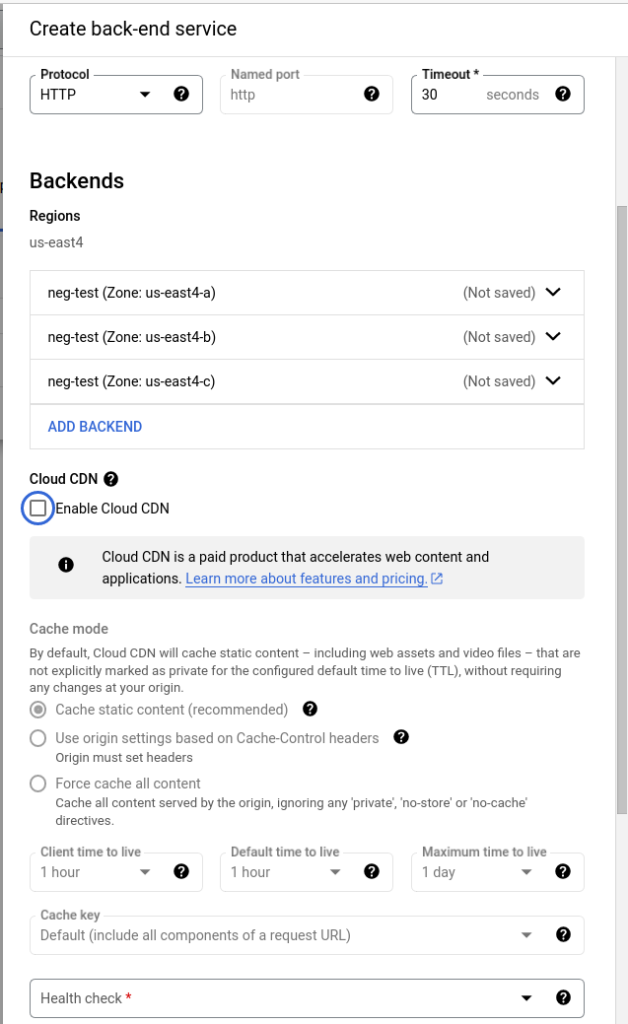
Select the Health Check dropdown and choose “Create a Health Check” which will take us to the Compute Engine.

On the Health Check page, give your health check a name, a description, and leave the remaining settings as is. Our NEG that we defined in our helm chart (service.yaml) is serving on port 80.
Pro Tip: You can adjust the health check settings entered here at a later time if needed by going to Compute Engine -> Health Checks.

Once you’re created the health check you’ll be back at the Create Back-end Service page. From here, you can enable logging, set security settings via Cloud Armor policies, and set Advanced Configurations. For now, leave all that “as is” and press the Create button to create the backend service.
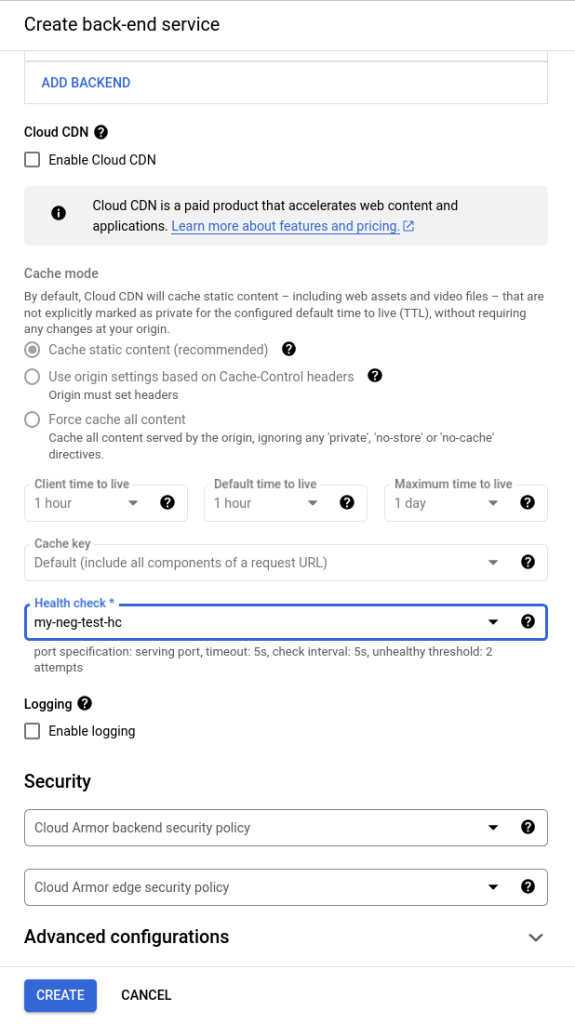
At this point in the process, we’ve set the frontend and backend.

Now we need to setup Routing Rules. Below is the default setup which will take all ingress traffic for the load balancer IP and route it to the GKE backend service attached to the NEGs we’ve configured.

Select Create from the portal. GCP will now create the load balancer.

Once the load balancer is finished created, you’ll notice that the backend has an orange alert symbol that looks like the following:

The solution is to create a firewall rule to allow the GCP health checker to access the NEG. Within the portal, navigate to VPC Networks -> Firewall and select “Create Firewall Rule”. When creating the firewall rule, the important parts are to:
- select the correct network that you’re GKE cluster is running on,
- set the priority appropriately to your existing firewall rules
- for targets –> select “all instances in this network” unless you are using tags or service accounts
- for source filter –> select “ipv4 ranges”
- for Source IPv4 ranges, allow GCP health checking to access the NEG by allowing the following two CIDRs. Details on the firewall rules for NEGs can be found here under the ‘Configuring firewall rules’.
- 130.211.0.0/22
- 35.191.0.0/16
- Under Protocols and ports, select “Specified protocols and ports” and enable TCP 80.
Pro Tip: If you use different container ports, ie 9376 for example (as shown in the GCP link example), you’ll need to update this rule by adding that port in addition to or replacing the 80, depending on your setup.
Below is a sample of what my firewall rule looks like for this example:

Once the firewall rule is created, go back to the load balancer page on Network Services –> Load Balancing. The orange alert should now be a nice green circle with a checkmark.

Select our new load balancer to inspect the details. Take note of the Frontend block that contains the IP. For this example we used an ephemeral IP but you can reserve that IP, or use a previous reserved IP that can be used with the global premium network. Your IP will most likely be different from the ephemeral one that was generated by GCP for this example.
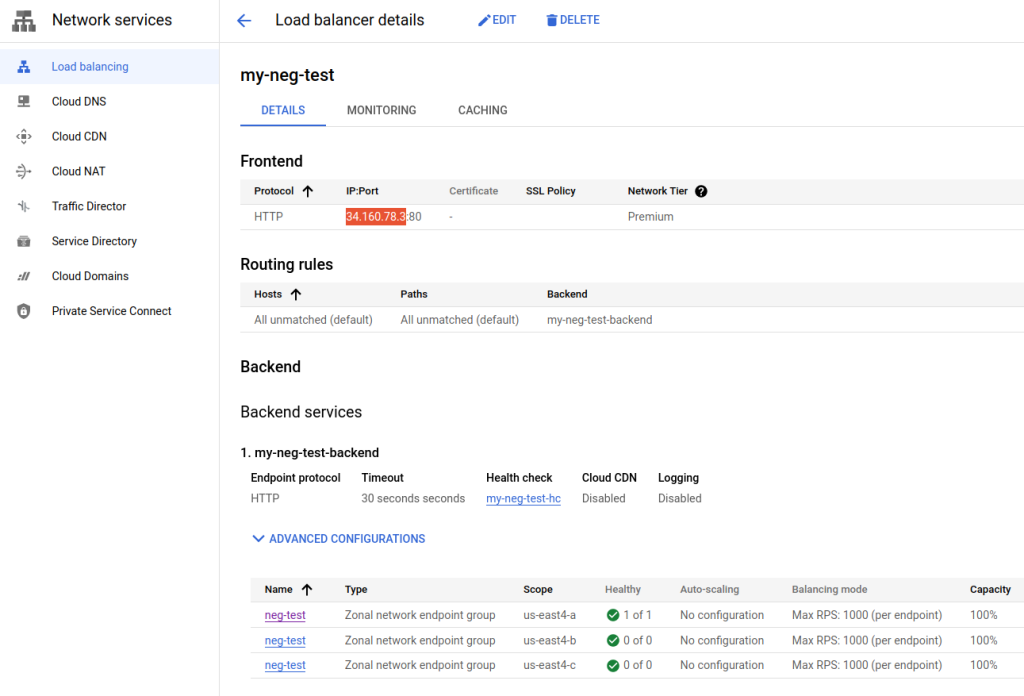
Select your IP and open it in a web browser. You should see the default nginx screen.

Next, we’re going to add an additional backend to this load balancer via Cloud Run.
Setup Cloud Run ‘Hello’ Service:
Within GCP Portal, go to the Cloud Run page. From here, we’re going to setup a new Cloud Run service that we can attach to our Load Balancer as an additional backend. Select Create Service to begin.
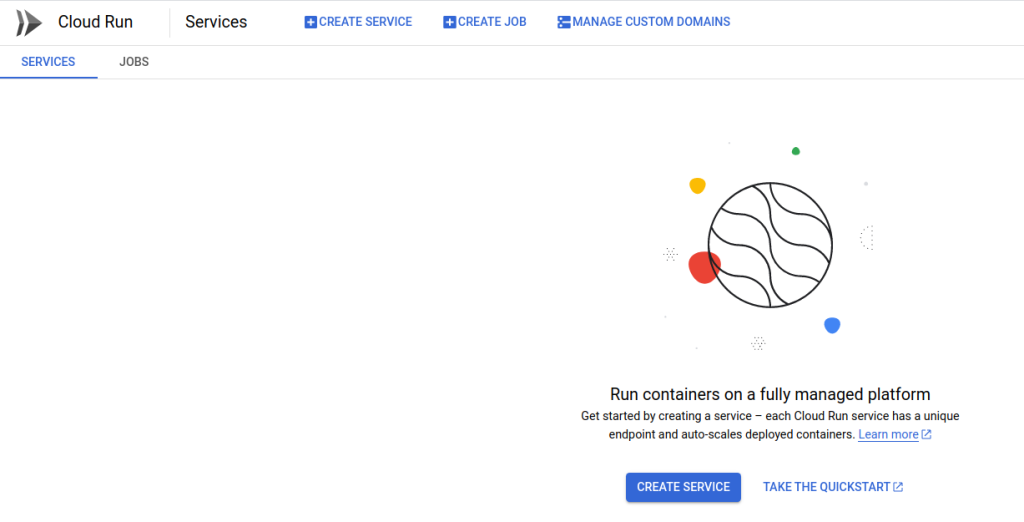
Press the “Test with a sample container” button (I’ve highlighted it in yellow). Further down select “Internal” and “Allow traffic from external HTTP(S) load balancer”
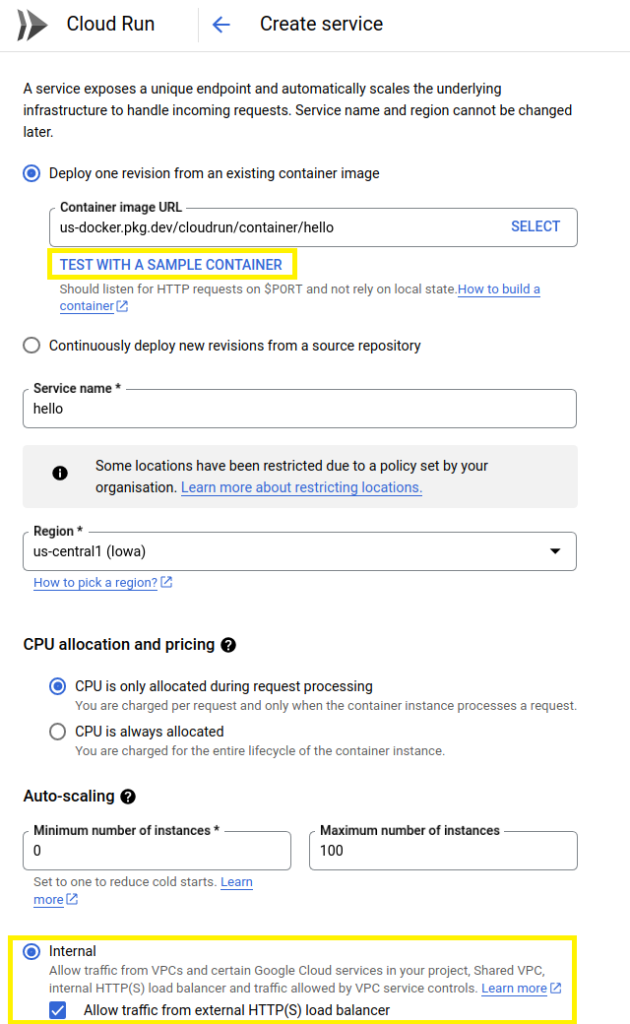
Finally, under the Authentication block, select “Allow unauthenticated invocations” so that users that get routed to this service can see what is being served. In the future, you’re use cases may require authentication, so remember that that is an option here. Click Create.

After a few seconds, the service will have been deployed. It should look similar to the following.

Let’s now go back to the Network Services –> Load Balancing page and add a new backend and route to our previous load balancer. Select our “my-neg-test” load balancer that we created before, then select Edit.

We’re going to keep the existing Frontend. Let’s add a new Backend. Select “Backend Configuration” and let’s add a new backend. Press the “Create A Backend Service” button.

On the resulting page, name the backend (ie, my-cloud-run-backend), give it a description (ie, hello example), and under the Backend Type, select “Serverless network endpoint group”. Notice how Cloud Run is explicitly listed for that option.

Once you’ve selected “Serverless network endpoint group”, scroll down to Backends and New Backend. From here, we need to create a “Serverless Network Endpoint Group”.

In the following page, give the new endpoint a name (ie, my-cloud-run-hello-neg), and select the region where the Cloud Run service was deployed. In my example, it was deployed to us-central1. Once you make your selections, press Create.

We’re now back to the “Create back-end service” panel. From here, uncheck the “Enable Cloud CDN” for this example. Note that the “health check” dropdown is not selectable for this Cloud Run backend. Click Create.
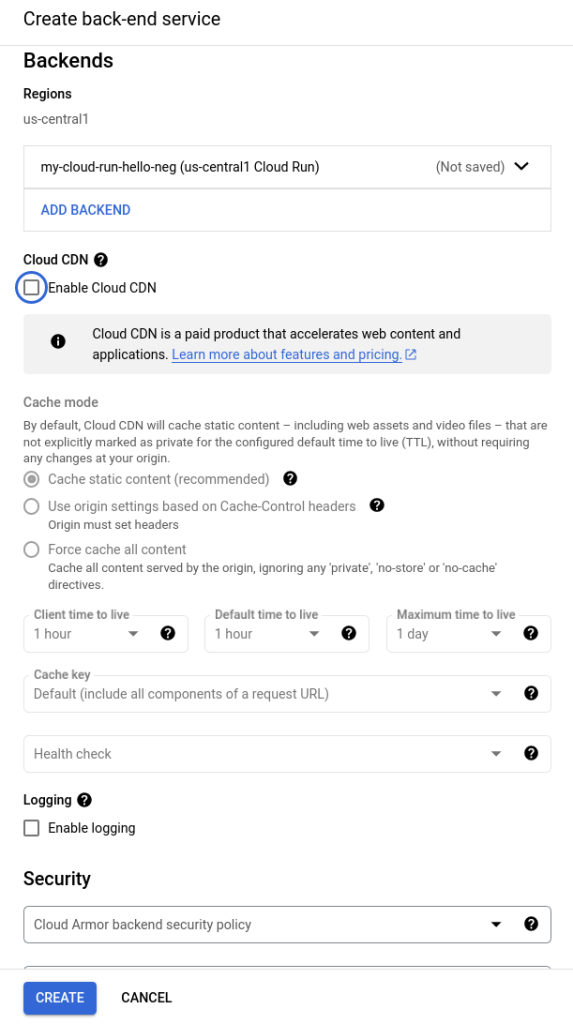
You should now be back to the top level edit menu that looks similar to the following. Note that I’m filtering backends for “my” so yours may look different.

Here’s the unfiltered view:

From here, select Frontend Configuration. Copy the ephemeral IP that the frontend is using. Next, select “Routing Rules”.

GCP added the new backend to the routes. For mine, the new “my-cloud-run-backend” is added as Backend 2. Note that for the new row for Backend 2, we need to add a host and path.
For the Host 2, enter your load balancer’s IP.
Pro tip: If you have a domain configured (beyond the scope of this example), here’s where you’d add it.
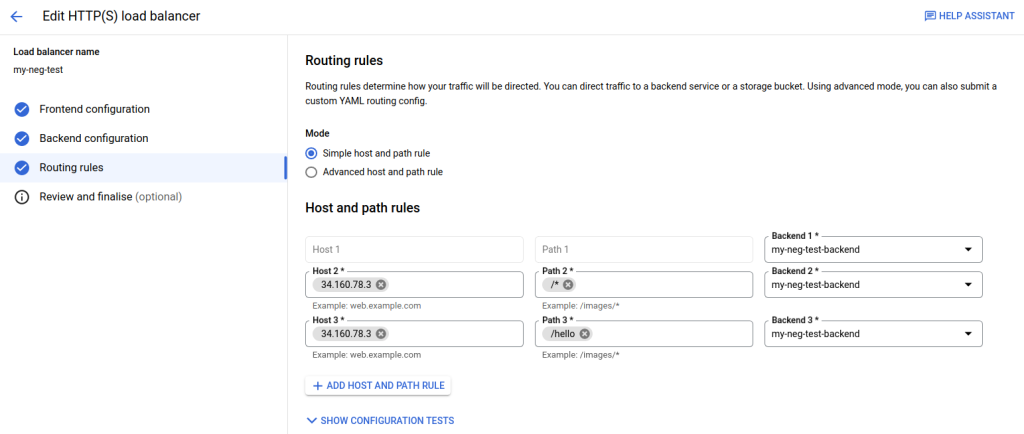
For Path 2, enter /hello and press enter We are going to route ingress traffic to the / endpoint to our nginx backend running on GKE. We’re going to route /hello endpoint traffic to our Cloud Run instance.
Your Routing Rules should look similar to the following:
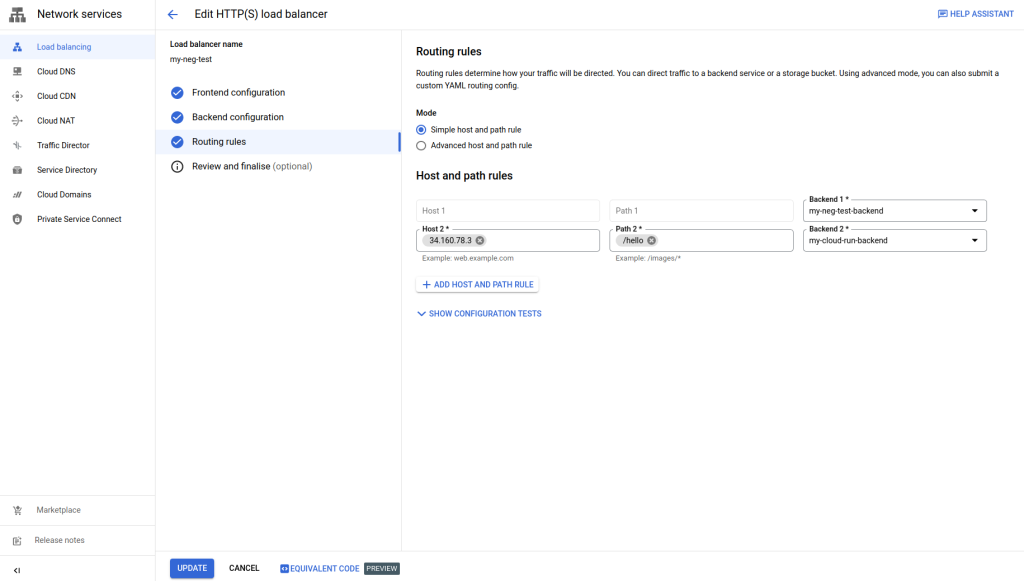
IMPORTANT: Press Update in the bottom left to save the changes and update the load balancer.
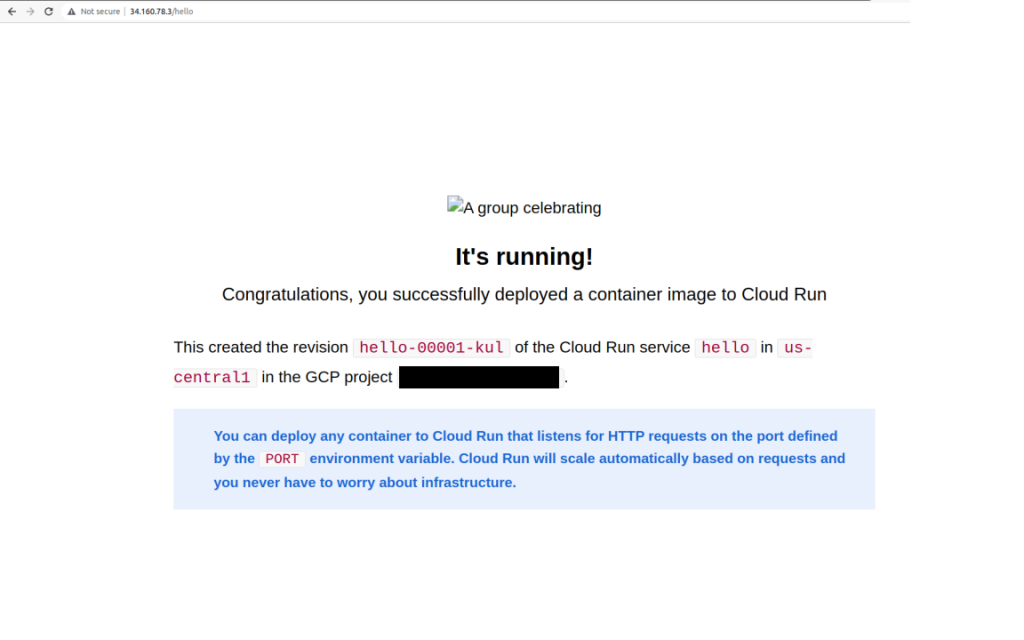
You should now be able to access <your ip>/ and <your ip>/hello via your browser.

Here’s the /hello route:
Pro Tip: 404!!! In the event that the /hello route gives you a 404 error, edit the load balancer routing rules. I’ve been able to replicate this issue and will keep an eye on it. Within Routing Rules, there’s actually three rows now. See below. Delete the duplicate path and press Update, and try loading the /hello page in your browser. It should now load (aside from some missing icons).
If you’ve made it this far, thank you! You’ve now seen the http basics of how to configure the GCP Global Load Balancer with a GKE backend and Cloud Run backend running in different regions. Try adding a certificate for https support!
Closing notes:
- To delete a NEG, there can be nothing referencing it. Uninstall the GKE service, delete the Load Balancer Backend, then you can delete the GKE hosted NEG (kubectl delete svcneg <the-neg-name>)
- Load Balancer backend health checks are found under Compute Engine –> Health Checks. You can edit them there.
