In this post I’ll show you how to use the VS Code “Remote – SSH” plugins to connect to a Google Cloud Platform (GCP) Compute Engine VM. For this you’re going to need:
- Ability to make firewall rules
- A Compute Engine VM (Linux)
- VS Code running on Linux
Let’s get started!
Step 1: Add a Firewall Rule tp Enable SSH into your VM
Let’s begin by logging into to your GCP Portal, making sure to select the desired project from the dropdown once logged in. Next, enter “firewall” in the search bar in the top of the portal and select Firewall from the results.

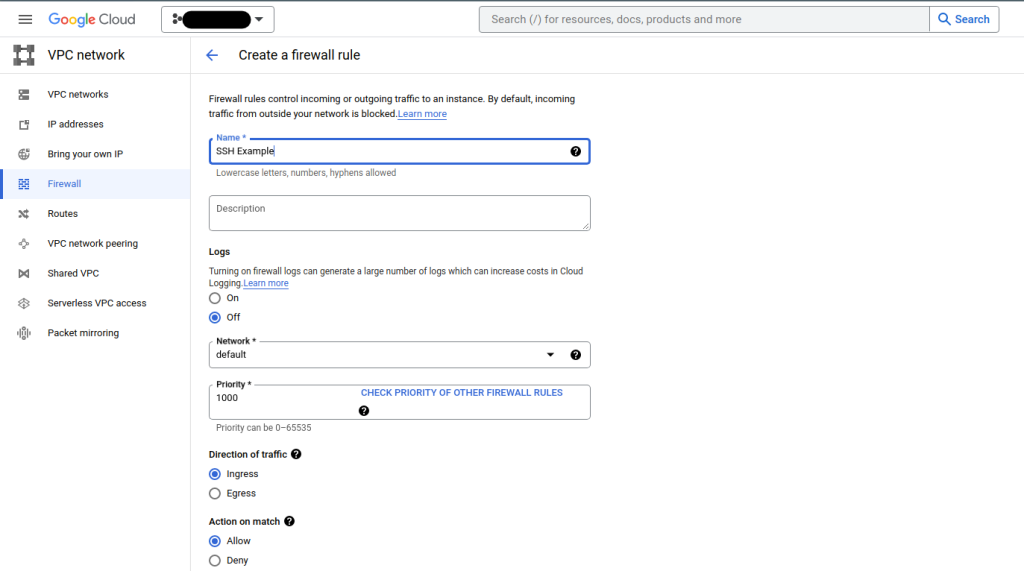
From here, select the “Create Firewall Rule” button and we’ll create the new rule.

Choose a name for the new rule (in this example I named it ‘ssh-example’). From here, you can also set the network that the firewall rule will be applied to. Leave the Priority as is for this example.

Scroll down to the Targets section. Here we’ll select “All Instances in the network”, however for tighter security in the future you can specify the name of the compute engine that this rule will apply to. In that case you would specify the Compute Engine instance name in the “Specified Target Tags” and enter the name as show in the Compute Engine instances page — ie, ‘wordpress-1-vm”.

Next, we’re going to limit the IP ranges that are allowed to connect to port 22 for our custom rule. Advice — do NOT use 0.0.0.0/0 — this will allow anyone in the world to attempt to SSH into your VM. Instead, we’re going to lock the allowable IPs to your PCs current IP. You can always update this IP later or add a broader range. In a new browser tab, go to https://whatismyipaddress.com/ and copy the ipv4 IP address to your clipboard.

For this example, let’s say the IPV4 is “101.102.103.104”. Going back to the firewalls rule window, we’ll now set a CIDR range of allowable IPs for this rule.

Note I added a /32 to the end of the rule. This is for a CIDR block. In this case, a /32 means no additional “wildcard” IPs can be allowed that follow the base pattern — ie, only this IP is allow.
The last step is to specify the Protocol(s) and Port(s) we want this firewall to apply to. Pick “Specified protocols and ports”, then select “TCP” and enter 22 in the ports field as shown below.

Click “Create” and your rule will be activated to allow only your IP to access the default network via port 22 for which Targets you specified (ie, all instances in the network or a specific compute engine instance you may have specified).
Step 2: Get the SSH keys for your Compute Engine Instance
Now that the firewall port is open to allow SSH outside of Identity Aware Proxy (IAP), we’re going to connect to the Compute Engine instance. Within the GCP Portal, navigate to the Compute Engine tab via the hamburger menu on the left hand side or search for it in the Portal searchbar similar to how we searched for Firewall.

Now you can see the Compute Engine instances for your project. Select the SSH dropdown for your instance and select “View gcloud command”. Copy the command to your clipboard.

Next, open a terminal window on your local linux machine and paste the gcloud command that you just copied. This will log you into your VM via SSH. This will update your known hosts under ~/.ssh
Note the username displayed in the terminal prompt. Type ‘exit’ to return to your local linux pc. Next, in the local terminal window. ssh into the VM’s by using its public ip. The command follows the following format:
ssh <user>@<public ip of compute engine vm>If you’ve made it this far, now it’s time to configure VS Code.
Step 3: Install VS Code Extensions for Remote – SSH
Open your VS Code and click on the Extensions on the left hand side of the window. This will open the Extensions Marketplace.

In the “Search Extensions” field, type “remote”:
Select the “Remote – SSH” Item and press Install. After a few seconds the plugin will be ready to use.

Once th plugins are installed press ‘F1’ to open a search menu at the top of the VS Code application. From here type Remote and select ‘Remote-SSH: Add New SSH Host” as shown below.

Next enter the ssh information that we tested above — ie, ssh <user>@<public ip of vm>

Note: Pay attention to the config file that is saved — it’s likely something like ‘/home/<you>/.ssh/config’
Once you’ve completed the above step, press ‘F1’ again and now search for “Remote” and select “Remote-SSH: Connect to Host”.

From here, select “Configure SSH Hosts …” so that we can make some edits to the newly added entry in the config file.

Select the config file where you saved the new entry. Mine is shown below.

Select the config file and it will open inside of VS Code. In the block for the item you just added, make sure it has the same fields as the following:

Save it and now press ‘F1’ again, select “Remote-SSH: Connect to Host” and now select the IP address for the entry.
If all goes as planned, VS Code will open a new session and connect to your Compute Engine instance. From here, you can do File > Open and your Compute Engine VM’s files and folders are now visible within VS Code!

